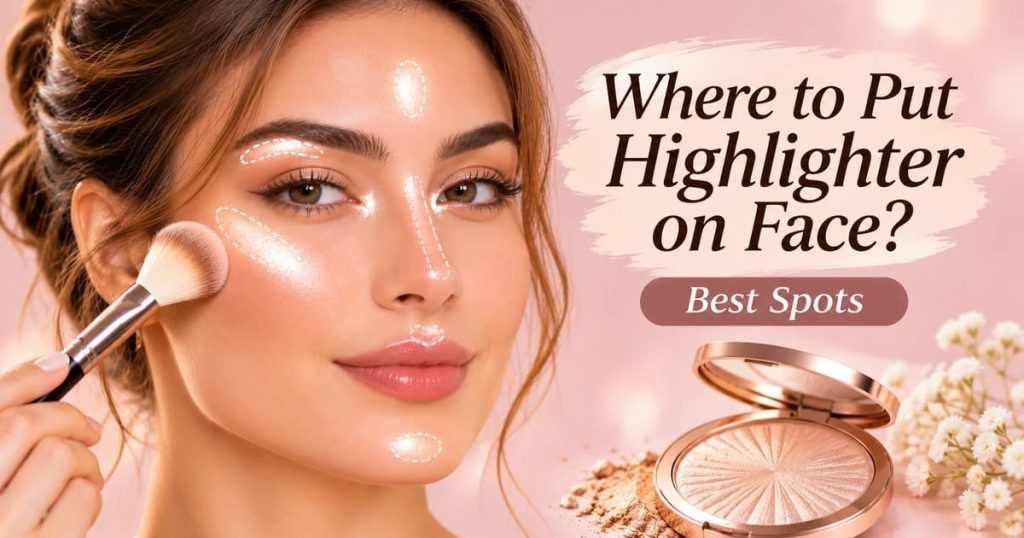
A little glow can make your skin look fresh and lit from within. Put it in the wrong spot, or use too much, and it can look shiny, streaky, or like you got into a jar of glitter. If you’ve ever wondered where to put highlighter on face for a natural, flattering look, this guide is for you.
The short answer is the high points of your face, where light naturally hits. But the best spots shift a little depending on your face shape, your skin texture, and the look you want.
Below, you’ll find exact placement for each area, how to adjust it for your face shape and mature skin, a simple beginner routine, and fixes for the most common problems.
Quick Answer: Where Does Highlighter Go?
The quick answer to where to put highlighter on face is this: for an everyday glow, apply highlighter to the tops of your cheekbones and, if you like, a touch on the brow bones and inner corners of your eyes. That’s usually enough. Everything else is optional.
If you want more definition, add a thin line on the nose bridge and a small dot on the Cupid’s bow. Skip any area where you already get shiny, or where you don’t want to draw attention.
Where to Put Highlighter on Face: The 7 Best Spots
Here are the seven classic placements. For each one, you’ll see exactly where it goes, how to apply it, and what it does.
- Cheekbones
This is the most important spot. Smile gently and find the highest part of your cheekbone, then apply from just outside the center of your eye toward your temple.
Tap the product on with a brush or fingertip, and blend the edges so there’s no visible line. It lifts the face and gives a soft, healthy glow.
- Temples
Extend the cheekbone highlight slightly up toward the temple, just where the cheekbone curves. Use a very light hand here.
This helps the glow look continuous instead of stopping abruptly. It’s a great step for a fuller, more sculpted look, and it’s easy to skip for a quieter finish.
- Brow Bones
Find the bone just beneath the arch of your eyebrow. Apply a small amount along the tail of the brow, and blend upward and outward.
It opens up the eye area and can make your eyes look more awake. Keep it subtle, since too much here can look frosty.
- Inner Corners of the Eyes
Place a tiny dot in the inner corner of each eye, near the tear duct. Use a small brush or fingertip, and tap it in.
This brightens the eyes and can help you look less tired. Pick a light, soft shade, and avoid glittery formulas close to the eyes.
- Nose Bridge
Draw a thin line down the center of your nose bridge, from between the brows toward the tip. A narrow stripe is plenty.
It adds dimension and makes the nose look straighter and slimmer. If your nose gets oily, use less product or skip the tip entirely.
- Cupid’s Bow
Dab a small dot at the center of your upper lip, in the dip of the Cupid’s bow. Blend lightly with a clean finger.
It defines the lips and makes them look a little fuller. Make sure there’s no shimmer running onto the lip itself.
- Center of the Forehead and Chin (Optional)
If you want a more balanced, all-over glow, add a small dab to the center of your forehead and chin. Blend outward in tiny circles.
This is purely optional. If your forehead or chin tends to get shiny, you can leave these alone.
Other Optional Spots
You can also tap a little highlighter on the center of your eyelid for a soft sheen. For a bare-skin look, collarbones and shoulders catch light well too, which is nice for summer or evening looks.
Quick Placement Guide
| What you want | Where to place it |
| Emphasize cheekbones | Upper cheekbones, blended toward temples |
| Brighten eyes | Inner corners and brow bones |
| Define lips | Cupid’s bow |
| Subtle nose highlight | Center of the nose bridge |
| Balanced facial glow | Cheekbones, plus optional forehead and chin |
| Body glow | Collarbones and shoulders |
Where to Put Highlighter Based on Your Face Shape
The basic answer to where to put highlighter on face works for most people. Still, shifting it a little can help you play up your favorite features.
These are suggestions, not rules. Your own preference matters most.
Round Face
Apply highlighter on the upper cheekbones in a slightly angled line toward the temples, rather than on the roundest part of the cheek. A small dab on the center of the forehead and chin can add a touch of length.
Oval Face
An oval face is balanced, so most placements work. Focus on cheekbones, brow bones, and the nose bridge, and add anything else you enjoy.
Square Face
To soften strong angles, put highlighter on the cheekbones and the center of the forehead and chin. This draws the eye toward the middle of your face rather than the corners.
Heart-Shaped Face
Heart-shaped faces tend to have a wider forehead and a narrower chin. A dab of highlighter on the cheekbones and the center of the chin adds balance, and a lighter touch on the forehead keeps it from looking too wide.
Where to Put Highlighter on Mature Skin
Mature skin can glow beautifully, and where to put highlighter on face matters even more when fine lines and texture are in play. Avoid heavy shimmer that settles into lines. The goal is a soft, luminous finish, not sparkle.
Here’s what tends to work well:
- Apply on the upper cheekbones, not directly over lines or on the fullest part of the cheek
- Choose a cream, liquid, or finely milled powder with a satin finish
- Press with your fingertip instead of sweeping with a brush
- Use a small amount on the brow bone to open up the eyes
- Skip glittery products and chunky shimmer
Age isn’t a skin type. What matters is your actual skin, whether that’s dry, oily, or textured, so match your product to that.
How to Apply Highlighter for Beginners
If you’re new to highlighter, the easiest way to learn where to put highlighter on face is to follow a simple routine. Start small, and add more only if you need it.
Step 1: Finish Your Base First
Apply foundation, concealer, and any cream blush before cream or liquid highlighter. For powder, apply it after you’ve set your makeup.
Step 2: Choose Your Formula
Powder is the easiest for beginners. Cream and liquid give a more skin-like finish but need a bit more blending.
Step 3: Find Your High Points
Smile and look in the mirror. The highest part of your cheekbone is where light hits first, so that’s your target.
Step 4: Use a Small Amount
Tap your brush or fingertip lightly in the product, and tap off the excess. You can always add more.
Step 5: Apply With the Right Tool
Use a small, fluffy brush or a fan brush for powder, and your fingertip or a damp sponge for cream and liquid. Stick highlighters work best dotted on and tapped in.
Step 6: Blend the Edges
Blend with soft, tapping motions until there’s no visible line. The glow should fade softly into your skin.
Step 7: Check in Natural Light
Look at your face near a window. If it looks too intense, press a clean sponge over it, or blend more.
Where to Put Highlighter With Blush and Bronzer
Cheek makeup works best when each product has its own zone. Here’s a simple way to layer them.
Bronzer goes on the outer edges of your face, where the sun naturally hits. Blush goes on the apples of the cheeks, and highlighter goes on top of the cheekbones, just above the blush.
Blend where the products meet so there’s no hard line. If you use cream products, apply cream blush first, then cream highlighter, then set with powder if you like. Using less of each keeps cheeks from looking heavy or patchy.
How to Choose the Right Highlighter Formula
The formula you choose changes how you apply highlighter, but not where to put highlighter on face. Here’s how the four main types compare.
| Formula | Best for | Notes |
| Powder | Beginners, oily or combination skin | Easy to control, can look dry on very dry skin |
| Cream | Dry or normal skin, natural look | Blend with fingertips or a sponge |
| Liquid | Diffused glow, mixing with foundation | A little goes a long way |
| Stick | Quick, precise application | Dot on, then tap in |
If you’re unsure, start with the one that matches your skin type, and see how it wears.
Best Tools for Applying Highlighter
The right tool helps you control how soft or intense the glow looks.
- **Fingertips:** Warm the product and give a natural, melted-in finish, ideal for cream and liquid
- **Small fluffy brush:** Gives precise, controlled powder placement on the cheekbones
- **Fan brush:** Deposits a very light dusting of powder
- **Damp sponge:** Presses cream or liquid into skin for a seamless finish
- **Small detail brush:** Useful for the inner corners and Cupid’s bow
Keep your tools clean. Washing brushes and sponges regularly helps them blend better and keeps old product from building up.
How to Choose a Highlighter Shade
Shade changes how visible the glow is, so it’s worth picking before you decide where to put highlighter on face. The goal is a shade that looks like light on your skin, not a layer of color on top.
- **Fair to light skin:** Champagne, pearl, and soft pink-gold tones look natural
- **Medium skin:** Warm gold, peach, and soft bronze add warmth
- **Tan to deep skin:** Rich gold, copper, and bronze show up beautifully
Shades that are much lighter than your skin can look ashy or chalky. If you’re stuck between two, pick the one closer to your natural skin tone, and test it on your cheekbone in daylight.
How Skin Type and Texture Affect Placement
Your skin type can change where to put highlighter on face and how much looks flattering. These tips are about appearance and application, not treating skin concerns.
**Oily skin:** Powder is usually the best pick. Keep highlighter to the cheekbones, and use less on the nose and forehead.
**Dry skin:** Cream or liquid formulas look smoother. Moisturize well before applying.
**Combination skin:** Use powder on the T-zone and cream on drier areas if you like.
**Sensitive skin:** Look for fragrance-free formulas and patch test a new product on your inner arm.
**Visible pores, fine lines, or texture:** Choose a finely milled or satin finish, use less, and avoid placing shimmer directly on raised or textured spots.
Should You Apply Highlighter Before or After Foundation?
It depends on the formula. Here’s a simple guide.
- **Cream highlighter:** Apply after liquid or cream foundation, before setting powder.
- **Powder highlighter:** Apply last, after foundation and powder.
- **Liquid highlighter:** Apply before or after foundation, or mix a drop into your foundation for a diffused glow.
Compatibility matters. If your products pill or slide, try changing the order or use a different formula. You can also wear highlighter without foundation, as long as your skin is moisturized and prepped.
Where to Avoid Applying Highlighter
When you think about where to put highlighter on face, it helps to know where to hold back, too. Too much shimmer in the wrong place can draw attention to things you’d rather not highlight.
Consider going light or skipping highlighter over:
- Visible pores
- Raised blemishes
- Fine lines
- Areas that already get shiny
- Uneven or textured makeup
None of these are strict no-go zones. It’s your face and your choice, so use these as guidelines.
Day vs. Night: Adjusting Your Glow
Your placement can change with the occasion. For daytime, keep things to the cheekbones and maybe the brow bones. A satin finish and a light hand look best in sunlight.
For evenings, you can expand where to put highlighter on face by adding the inner corners, nose bridge, and Cupid’s bow, and choose a more reflective formula. Indoor lighting is softer, so a little extra shimmer looks lovely.
Three Sample Looks to Try
Here are three sample looks showing how highlighter placement changes with the occasion.
**Natural everyday:** Cream highlighter on the tops of the cheekbones only, blended with fingertips. It takes about 30 seconds.
**Soft glam:** Powder highlighter on the cheekbones and brow bones, plus a dot on the inner corners and a little on the nose bridge.
**Full glam:** Cheekbones, temples, brow bones, inner corners, nose bridge, and Cupid’s bow, with a cream or liquid base underneath for extra luminosity.
Common Highlighter Mistakes and How to Fix Them
If your glow looks off, one of these is usually the culprit.
| Problem | Fix |
| Too much shimmer | Use less product and build slowly |
| Harsh lines | Blend the edges with a clean brush or sponge |
| Patchy highlighter | Check your base and formula compatibility |
| Emphasized pores | Use a finer finish and less product |
| Greasy-looking nose | Use less on oily areas, or skip them |
| Uneven cheek glow | Compare both sides and blend each one |
| Looks like a stripe | Apply a smaller amount and diffuse the edges |
Why Does My Highlighter Fade by Afternoon?
Highlighter can fade when it’s applied over a damp base, when the formula is too light, or when oil breaks it down. Let your base set first, choose a long-wearing formula, and touch up with a small amount of powder.
Do You Need Highlighter Everywhere?
No. For everyday makeup, cheekbones alone are often enough. Natural looks can skip the inner corners, oily skin can skip the forehead and nose, and mature skin often looks best with selective highlighting.
Save more placements for full glam or special occasions. Fewer, well-placed spots almost always look better than a lot of them.
Frequently Asked Questions
Where to Put Highlighter on Face for Everyday Makeup?
Stick to the tops of your cheekbones, and add a touch on the brow bones if you like. That’s all you need for a soft, natural glow.
Do you apply highlighter before or after blush?
Highlighter usually goes on after blush, on top of the cheekbones just above it. This keeps the colors from blending together.
Should highlighter go above or below cheekbones?
On top of the cheekbones, where the bone is highest. Placing it below can make the face look heavier.
Can you wear highlighter without foundation?
Yes. Moisturize first, and use a cream or liquid formula for a skin-like finish.
Where should I put highlighter on a round face?
Apply it on the upper cheekbones, angled toward the temples, instead of the fullest part of the cheeks.
Where should I put highlighter on mature skin?
Use a satin finish on the upper cheekbones and a small amount on the brow bone, avoiding heavy shimmer over fine lines.
Can you put highlighter on your nose?
Yes. A thin line down the nose bridge adds dimension. Use less if your nose gets oily.
Should you highlight your forehead and chin?
It’s optional. A small dab in the center adds balance, but you can skip it if those areas get shiny.
How much highlighter should you use?
Start with a small amount, and build up. It’s easier to add more than to remove extra.
Final Thoughts
Knowing where to put highlighter on face comes down to a few simple spots: cheekbones first, with brow bones, inner corners, nose bridge, and Cupid’s bow as extras. Adjust the placement for your face shape, skin texture, and the look you want.
Start with a small amount, blend well, and check your work in natural light. A subtle, well-placed glow is more flattering than a lot of shimmer.
If you want to read more about this, check out our detailed guide here:https://zaisufbeauty.com/how-to-determine-my-makeup-type/