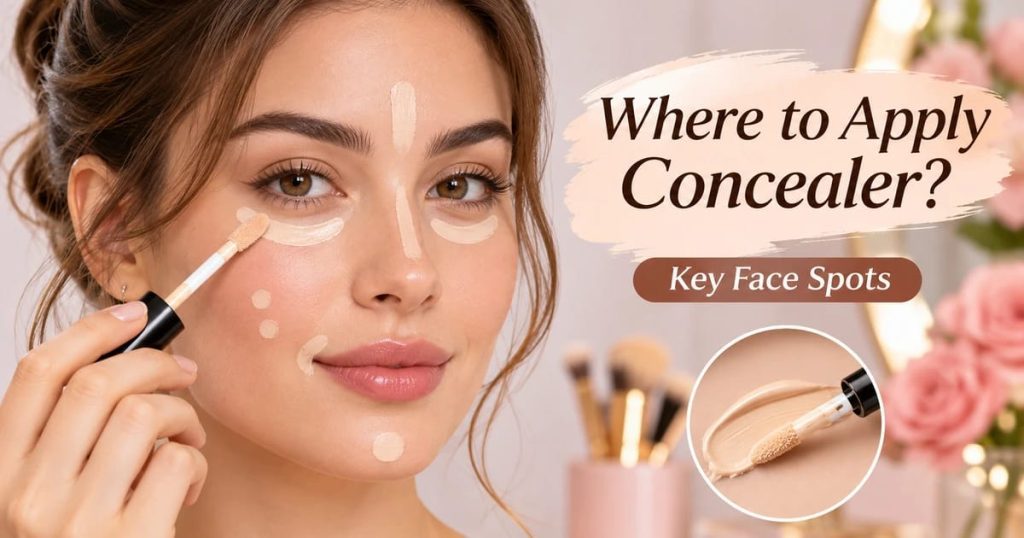
Concealer can make you look rested, even, and polished in about two minutes. It can also look cakey, gray, or patchy if it ends up in the wrong spot or goes on too thick. If you’ve ever stood at the mirror wondering where to apply concealer, you’re not alone.
The short answer is that concealer goes wherever you want extra coverage or brightness. That usually means under the eyes, on blemishes, and around the nose, but the best spots depend on what you actually want to cover.
This guide shows exactly where to apply concealer, how much to use, and how to blend it so it looks like skin. You’ll also find tips for dark circles, fine lines, pimples, and a minimal routine without foundation.
Quick Answer: What Is the Rule for Concealer?
There’s one simple rule: use less than you think, and put it only where you need it. Pick a shade that suits the job, apply a small amount to the exact spot, and blend the edges well.
For most people, the under-eyes and a few blemishes are all that need attention. Everything else is optional.
Where to Apply Concealer on Your Face: 9 Easy Spots
Here are nine places concealer can go, with where it sits, how to apply it, and what it does for you.
- Under Your Eyes
Apply concealer to the areas where you see darkness, not necessarily the whole under-eye. Dot it along the shadowed parts, then tap it out with your fingertip or a damp sponge.
This is the most common spot. It brightens the eye area and makes you look more awake, and a thin layer almost always looks better than a thick one.
- Inner Corners of the Eyes
Place a tiny dot in each inner corner, near the nose. Blend it outward with a light tapping motion.
The inner corner often looks darker, so this step can make eyes look brighter and less tired. A little goes a long way here.
- Outer Corners of the Eyes
Dab a small amount at the outer corner, and blend it slightly up and out. Some people draw a small “V” shape, but a simple dab works too.
It can give a lifted look, and it evens out shadows where the lower lid meets the cheek.
- Around the Nose and Nostrils
Redness often collects at the sides of the nose and in the crease around the nostrils. Use a tiny amount on a small brush, and press it in with a light touch.
Blend carefully to avoid buildup. This area moves a lot when you talk and smile, so thin layers hold up better.
- Blemishes and Dark Spots
Dot concealer directly on the spot, and pat it in with a fingertip or small brush. Blend only the edges, so you don’t wipe the product away from the center.
This is called spot concealing, and it’s often better than covering your whole face. Choose a shade that matches your skin.
- Cheeks and Cheekbones
Use concealer on cheeks only where you see discoloration, like a patch of redness or a dark mark. You can also tap a little on the high points of the cheekbone for a subtle brightening effect.
This step is optional, and it works best when you blend it into your base so you can’t see where it ends.
- Around the Mouth
Shadows or redness can gather at the corners of the mouth. A small dab there, blended gently, helps even things out.
You can also run a thin line around the outside edge of the lips for a cleaner lipline, especially before lipstick.
- Above and Below the Brows
Use a small angled brush to clean up the edges of your eyebrows. A thin line just below or above the brow creates a crisp, tidy edge.
Keep it very precise, and blend the outer edge so there’s no visible stripe.
- Chin and Forehead
Apply concealer to the chin and forehead only if you have spots or redness there. A tiny dot on the area you want to conceal is enough.
The center of the forehead can also be brightened lightly, but it’s an optional step that many people skip.
Another Optional Spot: Eyelids
A thin layer on the eyelids can even out color, and it can give eyeshadow something to grip. Use a very small amount, and set it lightly.
Quick Placement Guide
| Your concern | Where to apply it |
| Dark circles | The visibly dark areas under the eyes |
| Tired-looking eyes | Inner corners and select under-eye areas |
| Redness | Around the nose or on the red area |
| Pimples | Directly on the blemish |
| Dark spots | On the discolored spot |
| Uneven lip edges | Around the natural lipline |
| Brow cleanup | Just above or below the brow edge |
| General brightening | Select cheekbones and center of the face |
Where to Apply Concealer Under the Eyes for Different Concerns
Where to apply concealer under your eyes depends on what you see in the mirror. The same technique doesn’t work for every kind of darkness.
General Dark Circles
Look at the area in natural light. If the darkness is blue, purple, or brown, a color corrector underneath can help, and a thin layer of concealer goes on top.
Apply the product only where it’s dark. You don’t have to cover the entire under-eye.
Inner-Corner Darkness
Dab a small amount into the inner corner and blend outward. A slightly brighter shade can help here, as long as it stays close to your skin tone.
Outer-Corner Darkness
Apply a small amount to the outer corner, and blend upward and outward. This fades the shadow without adding bulk.
Hollow Under-Eye Shadows
If your under-eyes look hollow, a shade one or two steps lighter than your skin can reflect light and soften the shadow. Don’t go too light, or the area can look gray or ghostly.
Puffiness
Concealer can’t reduce puffiness. It can only change how it looks. Avoid placing a very light shade directly on the puffy area, since that can emphasize it, and apply it where the shadow falls instead.
Fine Lines and Creasing
Use thin layers, and tap the product on instead of dragging it. A lightweight, hydrating formula tends to look smoother than a heavy, dry one, and a small amount of powder is usually enough.
Concealer’s Four Jobs: Matching, Brightening, Defining, and Correcting
Concealer can do several different jobs, and mixing them up is a common reason it looks off.
- **Skin-matching concealer** covers blemishes, spots, and redness
- **Slightly lighter concealer** brightens select areas
- **A deeper shade** can add soft definition, if you like
- **Color corrector** neutralizes unwanted discoloration before concealer
Knowing which one you need tells you where to apply concealer and which shade to grab.
How to Use Concealer to Highlight and Contour
Concealer isn’t only for covering. A slightly lighter shade on the high points of the face, like the center of the forehead, the bridge of the nose, and the tops of the cheekbones, adds a soft glow.
A shade slightly deeper than your skin, applied beneath the cheekbones or along the jaw, adds gentle definition. Blend well, and keep the effect soft. Both steps are optional.
How to Apply Concealer Based on Your Face Shape
Where to apply concealer on different face shapes comes down to personal preference. These are ideas, not rules, and you don’t have to change anything.
Round Face
Brighten under the eyes and the top of the cheekbone. A little brightness at the center of the forehead and chin can add a feeling of length.
Oval Face
Oval faces are balanced, so the standard placements work well. Focus on the under-eyes and any spots.
Square Face
Use soft, selected brightening under the eyes and at the center of the forehead and chin. This draws attention toward the middle of the face.
Heart-Shaped Face
Heart-shaped faces have a wider forehead and a narrower chin. Brighten under the eyes and add a light touch to the chin, keeping the forehead understated.
Where to Apply Concealer on Mature Skin
Mature skin can look fresh and bright with concealer, as long as it doesn’t settle into fine lines. Age isn’t a skin type, so think about texture and dryness first.
- Use thin, buildable layers
- Avoid packing product into lines and creases
- Target the shadowed parts of the under-eye
- Moisturize first, since dry patches grab product
- Choose a creamy, lightweight formula
- Go easy on powder
Don’t expect any concealer to hide lines completely. A softer, blended look is more realistic and more flattering.
How to Apply Concealer for Blemishes, Acne Marks, and Redness
Different concerns need slightly different approaches. Here’s a simple guide.
| Concern | Guidance |
| Raised pimple | Use a small amount; makeup can’t erase texture, only soften it |
| Flat acne mark | Dab skin-matching concealer and blend gently |
| Redness | A green corrector can help, then skin-matching concealer |
| Concern | Guidance |
| Purple or blue discoloration | Choose a corrector that suits your skin tone |
| Around the nostrils | Press a tiny amount into the crease, avoiding buildup |
How to Apply Concealer on Pimples
Dot a small amount directly on the spot, then pat it in. Blend only around the edges so you don’t lift the product away. If you need more coverage, add a second thin layer after the first.
How to Apply Concealer for Beginners
If you’re new to makeup, the easiest way to learn where to apply concealer is to follow a simple routine. Start with a small amount and build slowly.
Step 1: Choose the Right Shade
Pick a shade close to your skin tone for blemishes, or a bit lighter for brightening under the eyes. Test it along your jaw in natural light.
Step 2: Prep Your Skin
Moisturize and let it absorb. Dry or flaky skin makes concealer look patchy, and skincare that hasn’t absorbed can cause it to slide.
Step 3: Dot Where You Need It
Put small dots on the areas you want to cover. Don’t swipe a line across your face.
Step 4: Tap and Blend
Pat the product in with a finger, sponge, or brush. Tapping blends without moving the product around, while rubbing can pull it off.
Step 5: Build If Needed
Add another thin layer only where you still see something. Stop when it looks natural.
Best Tools for Applying Concealer
Different tools give different finishes, and none is the best for everyone.
- **Fingers:** Great for small areas and creamy formulas, since warmth helps blend
- **Damp sponge:** Gives a soft, diffused finish, especially under the eyes
- **Small concealer brush:** Precise for blemishes, nostrils, and brow cleanup
- **Fluffy brush:** Good for blending around larger areas
If you use your fingers, the ring finger is gentle and works well for tapping around the eyes. Keep your tools and hands clean, especially when you cover blemishes.
How Much Concealer Should You Use?
Start smaller than you think. A grain-of-rice-sized dot under each eye and a pinhead-sized dot for each blemish is a good starting point. Let it sit for a few seconds, blend, and then check your face in natural light.
If you still see something you want to cover, add another tiny dot. Several thin layers look more natural than one thick one, and they’re easier to fix if you go too far.
Can You Apply Concealer Without Foundation?
Yes, and it’s a popular, easy routine. Where to apply concealer without foundation is simple: only on the areas that need it.
Moisturize first, then dot concealer on dark circles, blemishes, and redness. Blend the edges well into bare skin so there’s no visible line. Choose a shade that matches your skin, and check it against your neck.
Add a little powder only where you need it, and finish with blush or bronzer for a natural look.
Should Concealer Go Before or After Foundation?
There isn’t one universal rule. It depends on your formula and the finish you want.
Applying foundation first and then concealer where you still need it often uses less product and looks more natural. Applying concealer first can work for brightening or very full coverage, but you’ll want to avoid wiping it away when you apply foundation.
If something looks off, try the other order. Your skin and your products will tell you what works.
What to Apply After Concealer
Set it lightly with powder where you tend to crease, like the under-eyes, and skip powder where you want to look dewy. Then add blush, bronzer, or highlighter, and finish with setting spray if you like.
How to Choose the Right Concealer Shade and Formula
A good shade and formula make placement easier. Here’s what to look for.
Shade Basics
Match your skin tone and undertone for blemishes and spots. For under-eye brightening, go one or two shades lighter, but not so light that you look gray or chalky.
Formula Guide
| Formula | Best for | Notes |
| Liquid | Under eyes, natural coverage | Easy to build, can crease if applied thickly |
| Cream | Blemishes, fuller coverage | Press it on and blend the edges |
| Stick | Quick spot coverage | Dot on, then tap in |
| Lightweight or hydrating | Dry skin, fine lines | Usually looks smoother under the eyes |
Common Concealer Mistakes and How to Fix Them
Even if you know where to apply concealer, a few common problems can still show up. Here’s how to fix them.
| Problem | Fix |
| Under-eye creasing | Use less product and apply thin layers |
| Cakey look | Use less, and check your skin prep |
| Gray under-eyes | Reassess your shade, or try a corrector |
| Blemish still visible | Check your shade match and target the spot |
| Patchy blending | Check product compatibility and your technique |
| Powdery look | Use less powder and a lighter touch |
| Concealer separating | Review skincare, primer, and formula |
Do You Need Concealer Everywhere?
No. For everyday makeup, the under-eyes and a few spots are often enough. A natural look may not need foundation or full-face concealer at all.
Mature skin often looks best with selective placement. Save extra highlighting and contouring for special occasions.
Frequently Asked Questions
Where to Apply Concealer for Dark Circles?
Apply it on the visibly dark parts under your eyes, often the inner corner and the hollow near the cheek. Blend gently, and use a color corrector first if the darkness is strong.
Where exactly should concealer go on your face?
On any area you want to cover or brighten: under the eyes, around the nose, on blemishes, and on spots of discoloration. You don’t have to cover everywhere.
Do you put concealer under or over foundation?
Either works. Many people apply foundation first and then add concealer where needed, which tends to look more natural.
Should concealer be lighter than your skin?
For blemishes, match your skin. For brightening under the eyes, a shade or two lighter can work, but avoid going too light.
How do you apply concealer without foundation?
Moisturize, dot concealer on the areas that need it, and blend the edges into bare skin. Add a little powder only if you need it.
How do you stop concealer from creasing?
Use thin layers, a lightweight formula, and only a small amount of powder. Tap it on, and don’t overload the under-eye.
Should you put concealer on before or after powder?
Concealer goes on first, and powder goes on top to set it. This is especially helpful for the under-eyes.
Can concealer cover pimples and acne marks?
It can cover color and soften the look of marks, but it can’t erase texture on raised spots. A thin, targeted layer looks best.
How much concealer should you use?
Start with a small dot, and build only if you need to. Less looks more natural.
Final Thoughts
Knowing where to apply concealer is mostly about being selective. Under the eyes, on blemishes, and around the nose are the key spots, and the rest is up to you.
Choose the right shade, use a small amount, and blend until you can’t see the edges. A little concealer in the right place can do more than a lot in the wrong one.
If you want to read more about this, check out our detailed guide here:https://zaisufbeauty.com/best-korean-vitamin-c-serum/